What I've set down in "Part 2" below is probably not the best way to do glove fingers, but it came out fine for me. My reference was "Selbuvotter" by Terri Shea. This is a book of stunning Fair Isle mittens and gloves that originated with Norwegian settlers to the Pacific Northwest. The book documents a small part of the collection of textiles at Seattle's Nordic Heritage Museum. (Note to Su at WormSoup: You guessed it… I definitely want to go there!!) The basic approach calls for casting on stitches between the fingers to get the appropriate stitch quantity for each finger. Middle finger gets more stitches and pinky gets less, etc.
To figure out what stitch counts I needed for each finger I actually wrapped the glove cuff around that finger and counted. Since all of this was to be done in 1 x 1 rib, each finger had to have an even stitch count. I added my own rule that increased stitches had to be equal where one finger faced its neighbor. The result is spelled out in my instructions below.
***********************************
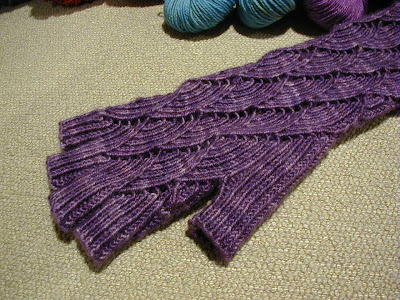
Part 2 - Mermaid Gloves, Fingers and Thumb
(See August 24, 2007 for Part 1)
This picks up after all of the fish scale patterning is complete, plus one row of rib per Part 1.
All of the fingers are knit in 1 K tbl x 1 purl rib.
First the planning. My map for transitioning the ring of stitches around the hand into fingers looks like this:
.....................Pinky...... Ring .....Middle..... Pointy
Sts from Top
of hand: ..........8........... 9........... 10.......... 9
Cast On
Stitches: ..............1..1........ 2..2.........1..1
Sts from Bottom
of hand: ..........9........... 8............ 9.......... 10
The map is read like this: Start with the Pinky. From the top side stitches keep 8 on your working needles and place the rest on a holder. From the bottom side stitches keep 9 on your working needles and put the rest on a holder. (I use extra circular needles as holders, but I suspect any holder will be annoying and get in the way. The circs certainly did!)
Knit around the finger to the point where you need to cross from top to bottom. Use a simple twisted loop cast on, (Vogue Knitting calls it a "single cast on"), to create 1 stitch between top and bottom. Keep the yarn tight as you continue knitting the bottom stitches and keep an eye on that rib. If you've got adjacent K tbls or purls, something's wrong.
Cast off when you're happy with the finger length. (You might want to write down how many rows you've got. I didn't, then later regretted it.)
For the Ring finger move 9 top side and 8 bottom side stitches to your working needles. As you cross bottom to top next to the Pinky, pick up 1 stitch. Make sure you pick it up through the cast on loop to keep the seam tight. On the side by the Middle finger cast on 2 stitches.
I'm pretty sure you can see where I'm going with this, so you can take it from here for the remaining fingers.
Now for the thumb. The thumb is also mostly knit in the 1 x 1 rib.
I had a mild design quandary at this point. I already had the stitch count I wanted, but when I pulled the active stitches together to close the thumb the fabric was too tight. The answer was to pick up 3 stitches above the thumb hole to relax the opening, bringing the count up to 26. When knitting the next row these three are stitched Ktbl P P so that you have P Ktbl P P Ktbl P P Ktbl. The bold stitches are the ones you picked up. On the next row P tog the two sets of double P stitches, bringing your stitch count to 24 and cleaning up your 1 x 1 rib. Cast off at the length that satisfies you, (and jot down that row count!).
Tuck all your ends and get ready to start again on the left glove. You may think all's smooth from this point, but I warn you that the true adventure begins here! More in Part 3.
*************************************
This freaky picture is my left hand with the thumb pointing left and fingers pointing right. It's supposed to show the area of P P Ktlb P P in the thumb rib. You can sort of see it, right?

I know that Su at WormSoup has a much better approach to glove fingers and I'm looking forward to reading those details! I really am happy with this thumb anyways, and very happy overall with the finished gloves.
Next up for my travel project could end up being either a sleeve for the Comings and Goings cardigan, or maybe the new RSC socks. Don't know. Don't know. Here are some of the projects and wools that are vying for attention:
 The dark blue skein is Wollmeise, color: Gewitterhimmel, (love that name!!). It has potential to be my sister's Mermaid Gloves, if it meets her approval for color. The big ball of wool is Fiesta Boomerang, color: Surf. I feel deep seated passion for this yarn and have purchased enough for a cardigan. A king size bedspread was tempting but seemed a bit excessive. (Note that the color looks a little weird in this picture.) The ball of multi surrounded by balls of solids is the newest RSC yarn, and those solids belong to the Comings and Goings Cardigan. There are two small balls of left-over wool that seem to want to be something together, maybe short fingerless gloves.
The shamelessly bright thing is my "brainless buddy", officially called Playing with Fire, but it earned its nickname by being so friendly to brainless loops-through-loops knitting. The background of this picture shows all of the recent purchases that threaten to push me off the sofa onto the floor. Have to clear the Knit Nest this weekend I think!
Cast off when you're happy with the finger length. (You might want to write down how many rows you've got. I didn't, then later regretted it.)
For the Ring finger move 9 top side and 8 bottom side stitches to your working needles. As you cross bottom to top next to the Pinky, pick up 1 stitch. Make sure you pick it up through the cast on loop to keep the seam tight. On the side by the Middle finger cast on 2 stitches.
I'm pretty sure you can see where I'm going with this, so you can take it from here for the remaining fingers.
Now for the thumb. The thumb is also mostly knit in the 1 x 1 rib.
I had a mild design quandary at this point. I already had the stitch count I wanted, but when I pulled the active stitches together to close the thumb the fabric was too tight. The answer was to pick up 3 stitches above the thumb hole to relax the opening, bringing the count up to 26. When knitting the next row these three are stitched Ktbl P P so that you have P Ktbl P P Ktbl P P Ktbl. The bold stitches are the ones you picked up. On the next row P tog the two sets of double P stitches, bringing your stitch count to 24 and cleaning up your 1 x 1 rib. Cast off at the length that satisfies you, (and jot down that row count!).
Tuck all your ends and get ready to start again on the left glove. You may think all's smooth from this point, but I warn you that the true adventure begins here! More in Part 3.
*************************************
This freaky picture is my left hand with the thumb pointing left and fingers pointing right. It's supposed to show the area of P P Ktlb P P in the thumb rib. You can sort of see it, right?
I know that Su at WormSoup has a much better approach to glove fingers and I'm looking forward to reading those details! I really am happy with this thumb anyways, and very happy overall with the finished gloves.
Next up for my travel project could end up being either a sleeve for the Comings and Goings cardigan, or maybe the new RSC socks. Don't know. Don't know. Here are some of the projects and wools that are vying for attention:
The dark blue skein is Wollmeise, color: Gewitterhimmel, (love that name!!). It has potential to be my sister's Mermaid Gloves, if it meets her approval for color. The big ball of wool is Fiesta Boomerang, color: Surf. I feel deep seated passion for this yarn and have purchased enough for a cardigan. A king size bedspread was tempting but seemed a bit excessive. (Note that the color looks a little weird in this picture.) The ball of multi surrounded by balls of solids is the newest RSC yarn, and those solids belong to the Comings and Goings Cardigan. There are two small balls of left-over wool that seem to want to be something together, maybe short fingerless gloves.The shamelessly bright thing is my "brainless buddy", officially called Playing with Fire, but it earned its nickname by being so friendly to brainless loops-through-loops knitting. The background of this picture shows all of the recent purchases that threaten to push me off the sofa onto the floor. Have to clear the Knit Nest this weekend I think!


