 The Featured Sheep this year was the Bluefaced Leicester, but each year I pick my own favorite breed. (In an alternate life I'll have a flock of these beauties, so it's critical that I make a careful selection!) For two years now the miniature breeds have been getting most of my attention. Here's a lovely little Cheviot sheep.
 Shetland sheep are another favorite, especially after working on Pyramids, a Ron Schweitzer Fair Isle design. I was surprised and thrilled to see Yarns International at the Fest this year. These folks are purveyors of Shetland wool and patterns and work closely with Ron Schweitzer, the artist of so many amazing Fair Isle designs in natural and dyed Shetland colors. Among the outrageous samples displayed in the booth was this one by Jennifer Lindsay, (photo from book).
  Check out that gorgeous and unique collar! I drooled puddles over the knit-up sample and then almost trampled my fellow shoppers after being told that the pattern was in Barbara Albright's book, "The Natural Knitter". I bought the book, specifically because I couldn’t resist this sweater, but I am already enjoying the rest of the content. I learned for example that goat tails stick up and sheep tails hang down... Crucial trivia at a Wool Fest!
Getting back to the sheep however, here's a collection of Shetland sheep that I really wanted to take home. Check out all the amazing range of colors! Shopping was wonderful. For me the height of joy is sitting on the floor of a yarn store or booth with my friend Susan from WormSoup. This trip we found ourselves on the floor in the booth of The Needle Lady from Charlottesville, VA, looking at Hanne Falkenburg and Vivian Hoxbro kits. I regained consciousness from my yarn trance with a kit in my lap that I'd been lusting after for three years. It was obviously fate. Yes, I bought it.
By the way, for all of you who are considering various kit purchases, I heard from the proprietors of Mostly Merino, from Putney VT, that they'd noticed that the average time for someone to break down and buy a kit that they've been considering is about three years. So even though you think you're being strong, unless you've gone past three years, that kit you've been resisting is probably in your future. Go ahead and buy it now! Get a head start!
Another booth where a surprising amount of money left my wallet was Golding RingSpindles. Tom and Diane Golding were showing a black walnut ball winder that crossed over from knitting accessory to furniture to art. I wanted this thing badly! I was good. I resisted. I stuck with my plan to buy a nice plastic ball winder, around $40, as recommended by Susan. My self-discipline was founded on the decision that I had to be sure I would use it before making a bigger investment. But next year look out…
The surprise purchase at the Golding booth was a "Learn to Spin" drop spindle kit. At lunch on Sunday Susan and I were joined by a group of avid spinners who convinced us that with a drop spindle by Tom Golding we'd master spinning in no time. They should have gotten a commission. We bee-lined back to the Golding booth and both purchased the kits. By dumb luck I fell in love with the spindle that was included in the kit. "Tsunami". Susan upgraded to a spindle that certainly crosses into the art world. I'm hoping she'll post a picture of it on WormSoup. (Hint, hint.) Susan and I also managed to come away with Socks that Rock sock yarn. Honestly I have to say that that's really trophy shopping. You can buy this yarn from Blue Moon Fiber Arts Inc. on line, but there's something about getting a few skeins at the Fest in person that just makes you feel a rush of superiority and victory. It even makes standing on one of the longest non-food lines in the Fest worthwhile. Near the end of the show we saw that there were only a few skeins left. Last year there were none, so I'm guessing The Fold probably brought an extra truckload.
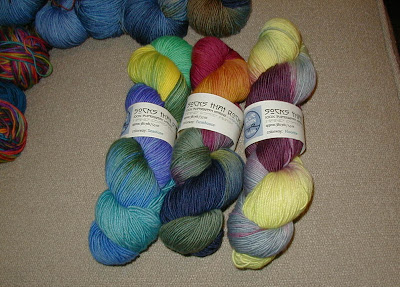 In addition to the shopping, we were excited to discover that Stephanie Pearl-McPhee would be speaking as part of the book signing, new this year. I think it's been over two years since I've laughed so hard. Really good for the soul. I was bummed to realize that the one thing I forgot to bring was my Yarn Harlot book, "The Secret Life of a Knitter", but hopefully another opportunity will present itself to get that treasured possession signed.
Stephanie once again accomplished the amazing feat of helping us all be proud to be knitters while at the same time poking fun at our obsessions. Members of "CHOKE" beware! (Cultural Humiliation Of Knitters Everywhere - a secret, but widespread organization.) Apologies to Stephanie for this poor picture. After this early shot I was laughing too hard to take another! There was much, much more, but I'll wrap up here with a picture from another favorite Fest moment. I touched noses with this friendly wool-bearing beast. It was a brief moment of communion with the creatures that bring us so much joy.
 I have good news on my sister's
  For relaxing evening knitting I brought my brainless buddy,
 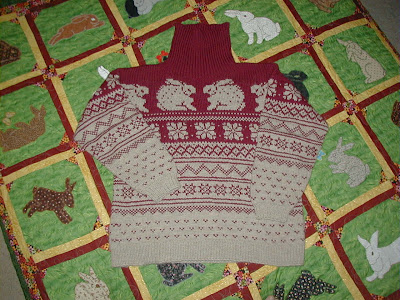 It was fun to see the determined few who were wearing lovely winter sweaters in the 72 degree weather, and also those who bravely fell back on draping a spectacular shawl over any warm weather clothes they'd packed regardless of color coordination. As always, the knitting skill on display was exciting and motivating.
 Issue #2 concerning the pattern rows… Well that's just strange. I spent some time staring at the chart with a big glass of red wine, but never saw the logic of why this pattern behaves so bizarrely when reversed. (Not sure that the red wine helped much there.) I've taken careful notes of what I did to deal with that however, and they're listed below as well.


 The photo above was edited to show front and back next to each other. (I only wish that I were that far along with the second glove!) I really do like the pooling shades, but they're not what I expected or discussed with Jo. If you've been following along you know that my determination to produce gloves that she'll love is making me a little bit batty.
 The loop at the bottom of this picture shows the re-established skein. It's looped into a horseshoe so that both ends are on the right. Once I figured out where the loop ends were I tied a loose knot at each end so that it would be easy to handle for measuring.
 I have two skeins left for this project. My next step will be to pick the skein which best matches the first one, especially in dyed loop length. That should (theoretically) give me similar pooling, all else staying the same.
