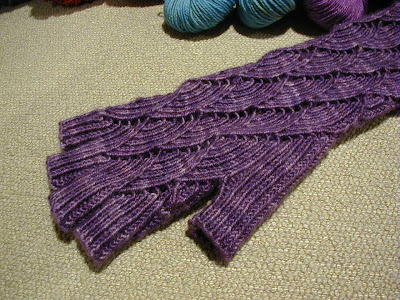
Showing posts with label Mermaid Gloves. Show all posts

Monday, October 12, 2009

Loopless

Usually I wait until I’ve got some knitting progress before posting, but there’s no actual news of that kind right now. I do have some interesting things to talk about though.

Important items first: Thank you to Suzanne and both Susan’s who left me such encouraging comments about PaintKnits TM!

Also important: I had a new question from Stephanie on the Mermaid Fingerless Gloves Part 1 post. She wanted to know how to do the gusset on the left glove. (I went through the detailed steps for the right glove only.) I’m not sure where you’re stuck, Stephanie, so I’ll note a few points that change and maybe it will get you through. Comment on this posting if you’re still stuck. (A return email address will get you a quicker answer if you’re in a hurry. I’m pretty sure there’s a way to show it just to me on a comment.)

The first thing that changes would be where to start the gusset. I’d suggest placing the started glove on your left hand with the knot at the middle underside of your wrist. You should then be able to identify which pattern group needs to become the gusset. In that block you’re once again going to omit all of the tog stitches just like for the right glove. That means you’ll need to replace all of the increasing stitches with the closest stitch type in a single stitch version.

Here’s another change. On row thirteen add the M1 following the eleven mirrored K tbl ribs instead of before. I’d suggest putting it before the existing purl stitch for perfect symmetry.

Those are the only differences I can see so I think that should cover it. Send some detail on where you run into trouble if I haven’t clarified it for you.

*********************

Now on to my knittingless knitting news. Let’s start with excuses. For the last couple of weeks I’ve been consumed with working on the PaintKnits website. The possibilities are really exciting and the more I do the more I think of that I want to do. Of course that all makes the thing more expensive, so once again I’m focused on doing as much as I can myself in a feeble attempt to keep the cost down. I have to admit though that my motivations could be more pure. I’m really just having fun.

I did spend some time on the double knit vest pattern. As you might remember I’m locked into a vertical dimension in order to get the pooling I want, (20.35 inches). In addition I expect the fabric to be fairly stiff with the double knitting in heavyweight sock yarn, so the dimension around must be just right. Too large will hang around me like a weird shell and too tight will just pull on the buttons or not close at all.

I pulled a bunch of vests out of my closet to judge the best fit in the length I’m using. I want to pick a circumference that will look right in that length. Currently I’m in trouble because the length is shorter than I was imagining so I have to decide whether to add a bottom border and if so, how long. So here are some vests of widely different fabric and styling:

First vest, my own design. Love the yarn, hate the vest shaping. I should frog it from the bottom and knit it back in a new stitch. Anyways it’s 21.5 inches and probably about the same stiffness as I expect from the double knitting.

Second vest, also my own design. It’s extremely flattering and one of my favorite garments, handknit or not. The length in the back is 20.4 inches, but it doesn’t work nearly as well with the front points rolled under. Also it’s very soft, flowy, and tight. Not what I expect from the double knit fabric.
Third vest, not my own work product. It’s a Woolrich garment but has stiffness and styling close to what I imagined for my double knit vest project. This one’s 22.8 inches.
Fourth vest, Shy Sheep Vest by Shelridge Farms. The long length is flattering, but works because the fabric is the softest and flowiest of the bunch. Fit is a little loose, but again it works because the soft fabric finds one’s figure. (I’ve actually knit this project twice. My mom liked it and wanted one too.) Note that it’s a shadow knit pattern of scattered sheep which you can only see from a side view.
Based on the above I’m thinking that I’ll match the design to the Woolrich circumference, (38 inches), and length. My PaintKnits pattern is at 38.34 inches and the row height is .15 inches from the PaintKnits gage info, so I’ll need to delete two rows from the width. (It’s knit from side to side.)

The length will need to be extended by about 2.5 inches. I’ll now need to decide whether to use the contrasting color, matching color, or color patterning for a bottom border. It's going to be hard to like the added edging when I’m so happy with the pattern as I’ve sketched it. That just means more sketching to be done. Oh well.

***************************

That’s a lot of mental work for me at the moment. I’m facing a group of personal challenges which have me a little overwhelmed. My cancer metrics aren’t looking so great so I’m totally stressing over the possibility of adding a new chemo on top of what I'm taking now. My dad’s in the hospital with a ruptured Achilles tendon. My job took this past Saturday from me for a trip to NYC for the AES conference, (well worth it though). And I’m frantically trying to pull myself together for the Rhinebeck Sheep and Wool Festival this coming week. It's just too much.

Still I’m looking forward to the Fest. I always do. 363 days a year actually. As usual I’ll be hanging out with my knitting mentor, Susan from WormSoup. We’re signed up for a Lily Chin class on diagonally knit pattern elements. You could guess that the topic intrigues me if you’ve looked closely at the Rhythm of Surf cardigan. By the way, the second vest, my favorite in the pictures above, was the result of a class I took with Lily some years ago about finding design inspiration. I’m very excited to be able to take a class with her again.

So I apologize for a total lack of loops through loops. And I’ll warn you now that the next post has a really good chance of being filled with Fest pictures instead loops!!

Thursday, November 8, 2007

Mermaid Fingerless Gloves, Postscript

It's finally time to wrap up this project and move on to new things. My sister's Mermaid Gloves are done and I have no plans to knit another pair, in spite of the various requests. There are too many other fun and fascinating patterns out there. Time is just too precious.

Before I leave the topic there are a few things that I learned on the second pair that really deserve mentioning along with my three part instructions, (August and October '07). Jo's pair was knit on US#1 needles, (the big US#1 if you like the accuracy of the metric world.), instead of on #0's. They were also knit from a lighter weight yarn, ShibuiKnits, rather than Socks that Rock Medium. I intentionally knit very tight for a minimized gage. The result was a glove that was shorter in length, but much more comfortable and wearable. My first pair feels a tiny bit bulky across the palm.

With the smaller gage I was afraid that the pattern would look excessively stretched when worn, but it really doesn't. I'm not sure what makes this pair more stretchy. It could be gage or yarn weight or some other yarn parameter that I can't name. Whatever it was, it worked out great. I'd recommend that if you're going to use Socks that Rock yarn, try the light weight instead of the medium. You might want to consider ShibuiKnits since that worked so well for me.


Look at the wonderful pooling I got from ShibuiKnits Midnight color! Here's palm down:And of course the thumb gusset that I'm so happy with... Here's palm up:

It was interesting that I got so used to doing the backwards Ktbl that it took some concentration to go back to the normal one. Some of that comes from doing two left gloves in a row, (mine second and Jo's first), but it also indicates to me that the stitch is really not that bad.

Overall, I'm very happy with the mirrored approach and still absolutely thrilled with my easy, organic thumb gusset. The slight difference in texture in the mirrored stitches is easily made up for by the symmetry in the final product and the opportunity to create this thumb gusset that grows out of the scale pattern. (That's my opinion obviously, and I expect that there are plenty of knitters and wearers that will disagree!)

Note to Monica (Passionknit): Glad to hear you're planned to knit your next pair mirrored! I'm looking forward to hearing what you think of the whole experience.

If there's anyone out there who really wants to take this project to the next level, they might be able to eliminate the slight texture difference in the mirrored stitch by spinning their own yarn, "S" twist for one glove and "Z" twist for the other. Go for it! I'd love for someone to confirm the yarn twist theory!

So that's all I have to say on the Mermaids. Now if I can just figure out how to hook all this info up with my new Ravelry account…

Note to Susan (WormSoup): Here's my active project list… Comings & Goings Cardigan, Playing with Fire Sweater, and Pyramids Sweater. The list is getting shorter again. Maybe the insanity has passed and I'm working my way back to being a "Serial Knitter". We'll see. I'd love to clear the sofa somewhat to make ready for a brand new project.

What's on your active list? Any Rhinebeck projects on needles yet?

Wednesday, October 24, 2007

Into the Knitting Community

There's an interesting thing about blogging and I guess writing in general. It's not always easy to accomplish what you intend. I've posted everything I discovered about the Mermaid gloves, especially the left glove, and found that my description of all of the difficulties and solutions could actually be intimidating instead of empowering. Monica's comment on my previous post was an eye opener! Looking back, maybe some projects are better attacked without knowledge of all the roadblocks that knitters will otherwise pig-headedly solve along the way. I'm still hoping that sharing my experience will be helpful to some who knit those gloves, but now see that it won't work for everyone.

One thing I have accomplished is the joy of communicating about a project that I found really fascinating. Follow-on correspondence with Monica opened my eyes to some other approaches for solving problems like the color change in the mirrored glove. It never occurred to me to knit both gloves in the same direction! Check out this gorgeous pair, (link referred by Monica):

http://www.flickr.com/photos/23695339@N00/1363193710

The exchange of ideas has really been fun and enlightening, and that's why I originally decided to blog. Thanks so much Monica!

And Susan from WormSoup likes my sketches! No accounting for taste they say. I had really planned to do something nicer, but just wanted to get that posting out fearing that someone was actually knitting up the gloves and might want it. As long as the standards don't get too much higher, there may be more sketches in me. Thanks for the compliment!

I've been distracted from posting for a bit by the impending Dutchess County Sheep and Wool Festival in Rhinebeck. I attended with Susan (of WS) again this year, and as always we had the time of our lives. Those two days have been the best days of my year for quite a few years running now.

I'll have more about that happy experience in my next post. Today I think I need to take a look at some of the projects that are lurking around my sofa, demanding that I hold back from attacking my new Wool Fest projects. Maybe it will help me keep from running in thirty directions at once!

Unfortunately my project status going into the Fest was not what I had hoped. Comings & Goings Cardigan couldn't be finished. I've actually completed all of the finishing work except for the collar and I-cord along the front opening and around the neck, but I can't decide whether that will be a button band or not. Oh well. At least the impending Fest motivated me to get on with sewing the sleeves and tucking ends. Here's where that project stopped. (The gloves were thrown in for scale.)

I have good news on my sister's Mermaid Gloves. I was hearing the call of the frogs, (ribit, ribit, rip it…), thinking that with the gage going small Jo would not like the length. Over the previous weekend she tried on the in-progress left glove and was not only happy with the length, she also really liked the ShibuiKnits Midnight color! Amazing! What a relief! And I won't have to knit the thing over again! So excellent! Not much progress since, but here's what they look like right now. (Susan - By the way the last photos weren't on the beach. I just wish they were! This photo shows the glove posing on Pyramids.)
For relaxing evening knitting I brought my brainless buddy, Playing with Fire to Rhinebeck. This sweater hasn't seen much action as I've pounded through the left Mermaid Glove and the C & G Cardigan. I was thinking that it would be nice to get back to that project, but the evenings were mostly dedicated to collapse from exhaustion.
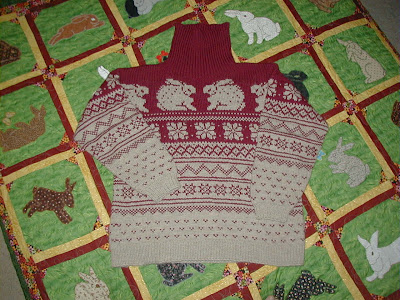
Lastly, my knitting fashion statement for the Fest… (Seeing everyone wearing their knit creations is a key part of this event!) Well this year I didn't really have a chance to show off anything. I put on my favorite old Bunny Sweater from way back, but that was way too warm. I was down to a t-shirt within 40 minutes. Here's the Bunny Sweater in case you think you might have seen me early Saturday. (The background is my wonderful Bunny Quilt from the Saint James Piecemakers.)
It was fun to see the determined few who were wearing lovely winter sweaters in the 72 degree weather, and also those who bravely fell back on draping a spectacular shawl over any warm weather clothes they'd packed regardless of color coordination. As always, the knitting skill on display was exciting and motivating.

So next year I should have Pyramids, C & G, and Playing with Fire to choose from, plus of course whatever creations come to me along the way! It would be awesome to have my Fiesta Surf Sweater done. Oh, the possibilities!

360 days to go!

Sunday, October 7, 2007

Pooling Mermaids

Looks like I've got a use for my PaintKnits program already! Jo's Mermaid Fingerless Gloves are pooling. We're not talking puddles. We're talking giant Olympic sized pools. All of those projects where I was dying to have the colors pool, but they refused. Now I'm looking for stripes and I end up with a total swim meet!! The photo above was edited to show front and back next to each other. (I only wish that I were that far along with the second glove!) I really do like the pooling shades, but they're not what I expected or discussed with Jo. If you've been following along you know that my determination to produce gloves that she'll love is making me a little bit batty.

Of course I'm also having a little issue with gage, (as always). The ShibuiKnits wool looked a tad fatter than the Blue Moon Fibers medium, plus my first pair of Mermaids was just a little tighter than I'd like. To compensate I moved to a US #1 and kept the knitting real tight. (Su at WormSoup: This was a big US #1, not the small. I wanted to use a small, but couldn't find one in my collection. Long live metric!)

The result has been pretty strange. The gloves are coming out slightly smaller than my first pair but are much more stretchy and comfortable. Weird. I'm sure Su will explain it to me. (The pressure's on, my expert friend! :-) )

At this point I think the key to this whole adventure is to have the second glove pool similarly to the first, so I'm going to see if I can take some control of these multi's. I've set up the Mermaid gloves in PaintKnits to simulate what's happening now, and plan to check the next skein to see if it's going to do the same thing.


The hardest part of this exercise is re-establishing the skein as it was looped for dying. Unfortunately ShibuiKnits is one of those wools where the wool is re-skeined after dying so that it's not as simple as untwisting the thing. In addition the shadings are subtle in strand form, showing up strongly only as they're knit. Here's what I came up with:
The loop at the bottom of this picture shows the re-established skein. It's looped into a horseshoe so that both ends are on the right. Once I figured out where the loop ends were I tied a loose knot at each end so that it would be easy to handle for measuring.

Now here's my simulated glove modelled on the skein that's currently in work. The program opens the circular knit and lays it flat so that the image shows the pattern all the way around. I'll admit that I'm surprised at how close this is to my results with the yarn! I'm one happy programmer!
I have two skeins left for this project. My next step will be to pick the skein which best matches the first one, especially in dyed loop length. That should (theoretically) give me similar pooling, all else staying the same.

Of course while I'm working on all of this my Comings & Goings cardigan is languishing for its finishing work. If I don't hustle it won't be ready for me to wear to the Dutchess County Sheep and Wool Festival, and that will be a huge disappointment. I'll have no new FO to show off! Very upsetting… but not upsetting enough to motivate me into tucking ends and sewing sleeves!!

Friday, September 28, 2007

Knitting Geek

It was bound to get out eventually so I finally added it to my profile. Yes, I admit it. I'm an engineer. Mechanical by training. And I really like being a mechanical engineer. So that of course means that there's no escaping the fact that I'm a geek.

If you really love knitting you find that it interacts with all of the other important aspects of your life, whether it's wrapping itself around your loved ones or distilling inspiration from the other hobbies that excite you. In my case, my most recent knitting adventure has been to write a computer program to simulate the way a multi-colored yarn will flow onto a particular stitch pattern. (Geek!) I'm working on an Excel spreadsheet that takes information about a skein of multi, some pattern details, some gage information, and then paints a view of how the colors will lay out on the knitting.

Now that I'm doing it I'm sure I'm not the first. This is just the kind of tool that someone would need to create a self-patterning sock wool, but as far as I know, there's nothing on the market like it. (That's probably because no one would actually pay for it.) But it sure is fun to play with! My spreadsheet works, so now I'm writing in some features that will make it easy and fast to use. I'd like it to be able to paint-knit an entire sock, but that may be a dream.

This whole thing came from running my brain on "My Big Knitting Problem", mentioned in my last posting. I have purchased a big pile of Fiesta Boomerang in the color "Surf", but am really having trouble planning a project for it. My "Playing with Fire" sweater fair isle stitches a multi with itself, but that just didn't seem right for my Surf Sweater. I love the colors so much that I want to actually paint the sweater with them. It became obvious that I needed a tool to help me design.

Anyways, when I finish this program I will gladly share it with any other knitting "control freaks" who just have to know how a multi will act on a given group of stitches. There are plenty of knitters who live for the surprise and spontaneity of multi yarns, alternately cursing and raving about pooling and striping. I intend to bend these colors to my will. (Evil laughter echoes in the background…)

After such fiendish thoughts we need to take a happy sheep break, so here's some original art I purchased this weekend at the Long Island Apple Festival. The artist, Judy Lambros, belongs to the Peconic Ruggers Guild which apparently is open to new members. It all sounds wonderful, but too much for me right now. If anyone out there wants more info just leave me a comment that I can reply to. Getting back to the story of my sister's gloves: This past weekend I introduced Jo to ShibuiKnits "Midnight" wool, hoping like crazy that she'd love it for her Mermaid Fingerless Gloves. Oh well. Another dream shattered. She waffled between that and the Wollmeise "Gewitterhimmel" and didn't seem thrilled to pieces with either. I have been hugely leaning toward the ShibuiKnits, so I suppose I somewhat convinced her to go with that one. Mostly I was concerned that I might not have enough of the Wollmeise, and Germany's a long way off if I run out!

Anyways it's a done deal. I even started knitting this next pair of Mermaid Gloves last night. The ShibuiKnits is very pleasant to work with and I am liking the color more and more as I knit it up. Of course now I'm worrying because the shadings are pooling. I like that a lot, but will Jo? And will the right and left pool similarly? The stress never ends!!
I've dug in on the left glove first so that I can write up Mermaids Part 3 as soon as possible. The extra wait has been worth it. The creative break triggered an inspiration for solving one of the rotten problems with this mirrored thing. Soon, soon…

Friday, August 31, 2007

Mermaid Fingerless Gloves, Part 2 - Fingers

I’m just finishing up the fingers of the left glove, so this is a good time for me to report my methods. Notes really don't cut it when you've truly forgotten what you've done!

What I've set down in "Part 2" below is probably not the best way to do glove fingers, but it came out fine for me. My reference was "Selbuvotter" by Terri Shea. This is a book of stunning Fair Isle mittens and gloves that originated with Norwegian settlers to the Pacific Northwest. The book documents a small part of the collection of textiles at Seattle's Nordic Heritage Museum. (Note to Su at WormSoup: You guessed it… I definitely want to go there!!) The basic approach calls for casting on stitches between the fingers to get the appropriate stitch quantity for each finger. Middle finger gets more stitches and pinky gets less, etc.

To figure out what stitch counts I needed for each finger I actually wrapped the glove cuff around that finger and counted. Since all of this was to be done in 1 x 1 rib, each finger had to have an even stitch count. I added my own rule that increased stitches had to be equal where one finger faced its neighbor. The result is spelled out in my instructions below.

***********************************

Part 2 - Mermaid Gloves, Fingers and Thumb
(See August 24, 2007 for Part 1)

This picks up after all of the fish scale patterning is complete, plus one row of rib per Part 1.

All of the fingers are knit in 1 K tbl x 1 purl rib.

First the planning. My map for transitioning the ring of stitches around the hand into fingers looks like this:

.....................Pinky...... Ring .....Middle..... Pointy
Sts from Top
of hand: ..........8........... 9........... 10.......... 9

Cast On
Stitches: ..............1..1........ 2..2.........1..1

Sts from Bottom
of hand: ..........9........... 8............ 9.......... 10

The map is read like this: Start with the Pinky. From the top side stitches keep 8 on your working needles and place the rest on a holder. From the bottom side stitches keep 9 on your working needles and put the rest on a holder. (I use extra circular needles as holders, but I suspect any holder will be annoying and get in the way. The circs certainly did!)


Knit around the finger to the point where you need to cross from top to bottom. Use a simple twisted loop cast on, (Vogue Knitting calls it a "single cast on"), to create 1 stitch between top and bottom. Keep the yarn tight as you continue knitting the bottom stitches and keep an eye on that rib. If you've got adjacent K tbls or purls, something's wrong.

Cast off when you're happy with the finger length. (You might want to write down how many rows you've got. I didn't, then later regretted it.)

For the Ring finger move 9 top side and 8 bottom side stitches to your working needles. As you cross bottom to top next to the Pinky, pick up 1 stitch. Make sure you pick it up through the cast on loop to keep the seam tight. On the side by the Middle finger cast on 2 stitches.

I'm pretty sure you can see where I'm going with this, so you can take it from here for the remaining fingers.

Now for the thumb. The thumb is also mostly knit in the 1 x 1 rib.

I had a mild design quandary at this point. I already had the stitch count I wanted, but when I pulled the active stitches together to close the thumb the fabric was too tight. The answer was to pick up 3 stitches above the thumb hole to relax the opening, bringing the count up to 26. When knitting the next row these three are stitched Ktbl P P so that you have P Ktbl P P Ktbl P P Ktbl. The bold stitches are the ones you picked up. On the next row P tog the two sets of double P stitches, bringing your stitch count to 24 and cleaning up your 1 x 1 rib. Cast off at the length that satisfies you, (and jot down that row count!).

Tuck all your ends and get ready to start again on the left glove. You may think all's smooth from this point, but I warn you that the true adventure begins here! More in Part 3.

*************************************
This freaky picture is my left hand with the thumb pointing left and fingers pointing right. It's supposed to show the area of P P Ktlb P P in the thumb rib. You can sort of see it, right?

I know that Su at WormSoup has a much better approach to glove fingers and I'm looking forward to reading those details! I really am happy with this thumb anyways, and very happy overall with the finished gloves.

Next up for my travel project could end up being either a sleeve for the Comings and Goings cardigan, or maybe the new RSC socks. Don't know. Don't know. Here are some of the projects and wools that are vying for attention:

The dark blue skein is Wollmeise, color: Gewitterhimmel, (love that name!!). It has potential to be my sister's Mermaid Gloves, if it meets her approval for color. The big ball of wool is Fiesta Boomerang, color: Surf. I feel deep seated passion for this yarn and have purchased enough for a cardigan. A king size bedspread was tempting but seemed a bit excessive. (Note that the color looks a little weird in this picture.) The ball of multi surrounded by balls of solids is the newest RSC yarn, and those solids belong to the Comings and Goings Cardigan. There are two small balls of left-over wool that seem to want to be something together, maybe short fingerless gloves.

The shamelessly bright thing is my "brainless buddy", officially called Playing with Fire, but it earned its nickname by being so friendly to brainless loops-through-loops knitting. The background of this picture shows all of the recent purchases that threaten to push me off the sofa onto the floor. Have to clear the Knit Nest this weekend I think!

Friday, August 24, 2007

Mermaid Fingerless Gloves, Part 1 - Easy Gusset

Mermaid Gloves; Slip Knot through Gusset

Sometimes knitting is more fun when it's not a mystery to be solved. This post is for all the knitters seduced by the Mermaid Gloves who are wishing for a simple loops-through-loops fiber experience.

I've jotted down the details of how I made the Mermaid Gloves, and will be presenting the info in several parts. My mission is not to create a stand-alone pattern, but to eliminate the mysteries that I had to work through along the way. If you're going to print your reference material and wander away from the computer, make sure you print the Pomatomus Socks pattern. I will try to incorporate enough of Steph's clues from the Craftoholic site so that you don't need to carry those pages as well, (although those pictures really do offer a high "drool" factor).

My biggest mystery was the gusset. These instructions will walk you through the gusset design that I came up with, (shown in the pictures here and previous). It doesn't match the one that Steph used, but I'm thrilled with it and hope you will be too!


********************
Part 1 - The Right Glove from Cast On to the Base of the Fingers

My supplies:
Blue Moon Fiber Arts, Socks That Rock Medium weight yarn in Tanzanite
One set of KnitPicks #0 circular needles, 32", (I used the Magic Loop technique)
Print out of the Pomatomus Sock pattern

Gage: The charted stitch pattern measures 1 inch wide by 2 1/8 inch tall for my gloves. They're knitted to be a little tight for me in order to get a cozy fit around my hand.

Start out following the Pomatomus sock pattern; Ribbed cuff, then six horizontal pattern repeats around, stacked three high. Keep an eye out for the stitch that migrates between needles after each row 22, otherwise you'll be wondering why things don't line up on the next row 1.

As in Steph's notes, the gusset is made in the fourth vertical pattern group. I built my gusset in the fourth horizontal pattern repeat, first on the second needle. (That positions the slight unevenness associated with the cast-on knot on the underside of the arm.) Here's the complicated part… In that pattern block omit all of the "tog" stitches, instead knitting the two stitches that would have been tog'd to match the previous row's stitches. K tbl the Ktbl'd stitches and purl the purled stitches.

Work this way throughout that whole pattern block, (through row 22), with one other minor change. On row 13 add a stitch, (M1), located such that it precedes 11 K tbl ribs waiting on the left needle. I suggest adding this stitch after the normal purl between the ribs just because it seems easier than adding it before. Purl this extra stitch in every following row so that there are two purl stitches next to each other and then 11 K tbl ribs. This gives definition to the fish scale on the top of the hand.

After finishing row 22, put the extra 23 stitches on a holder starting with the double purl. Join the remaining stitches back into a round on the next row 1. Knit one more pattern repeat with all six pattern blocks normal per the chart.

Knit one row of 1 x 1 K tlb purl rib all the way around.

Now you're ready for fingers and thumb. But that's enough for me for now!

*************************************
This picture's actually the left glove but I mirrored it to make it a clear reference:

Pretty easy, huh? Wish coming up with that gusset was as easy as knitting it! The design inspiration came after figuring out from the Craftoholic pictures and other gusset approaches that I wanted to increase 22 stitches over 22 rows. Normally these would be increased one each before and after the gusset on every other row. I figured I'd ditch the togs and see what happened knowing that I'd end up with the same count of extra stitches. I was thrilled, although I did rip back to add that M1 on row 13.

I'll report the details of how I did the fingers and thumb soon. The thumb still took an additional trick to give it the look I wanted. As for the fingers, I'm sure what I did was not the best approach, but it worked out fine in the end.

Currently I'm slogging through the left glove. It's been a significant and surprising bundle of challenges. There will be more on that too once I've blurted out all my secrets from the right glove.

Happy Knitting!

Saturday, August 18, 2007

A Dangerous Project

Every knitter who sees even a picture of the Mermaid Fingerless Gloves feels they must knit them. It turns out that the Mermaid Gloves can also trigger a loss of control when it comes to stash building. My sister requested a pair following brief exposure to those bewitching pictures, and the excuse to shop has inundated my Knit Nest in sock wool. Worst of all, I still don't have a yarn that is just right for my sister's pair.

Of course the logic along the way seemed perfectly solid… Buying three skeins to make up for the one, out-of-stock favorite. Buying additional skeins rather than making any really hard decisions. Placing another multi-skein order when the favorite is suddenly re-stocked. And of course we all know what happens once you get close to free shipping! The Loopy Ewe website is truly a scary and wonderful place.


Anyways, here's my take on the yarns that have recently added themselves to my Knit Nest environment:

Fiesta Boomerang. Wendy Knits wasn't kidding about this stuff being soft. It's amazing. Plus the artist who selects the colors has a happy talent for creating striking combinations that really do invoke memories of stunning landscapes. The strands have a really interesting twist too, something like a thin and thick ply twisted together, giving it a really unusual look, almost un-fiber-like. It's slightly heavy for a sock but I can't wait to try it. (Colors: Australia, Madrid, and Poppies. Australia's at the back right of the photo. Poppies and Madrid are in the middle on the left.)

Lorna's Laces also have champion color combinations and a wide variety to choose from at the Loopy Ewe. The yarn itself is the least soft of this recent batch and the twist is not as tight and springy as the others. Anyways, I know it has knit up nicely for other people, so I'm hoping it will play nice with me. (Color: Purple Club, Lakeview. Middle four skeins on the right.)

Cherry Tree Hill looks like it will give me a nice stitch definition with its tight, hard twist and its no-nonsense lack of fluff, plus it has the softness you'd expect of Merino. Unfortunately the color we selected was very different from the picture on the website. I like it anyways, but my sister didn't so there's serious danger that my stash expansion is not over. (Color: Moody Blues. Front right.)

Claudia Hand Painted Yarns wins the prize for eye-popping intensity. The photo above doesn't do it justice. The rich, deep, cool magenta is absolutely paralyzing. Stranding is also springy and fluff free. I'll have to pick a truly lovely stitch for this wool because once your eye hits it, it's really hard to look away. On top of all that, only the Fiesta beats it for softness. (Color: Crushed Velvet. Front left.)

The Knittery skein was unusual in that it carries a confident fluff, exuding inviting softness. I might not pick a fancy stitch with it but my feet are already wishing to take refuge in this yarn. The soothing garden colors match well with the wool's foot-friendly appearance. (Color Holiday. Back left.)

Overall, the award for the yarn calling to me most loudly goes to the Fiesta trio. Can't keep my hands off them!

So my stash is pushing me off the sofa. It's not my fault. All the blame goes to the Mermaid Gloves. Definitely a dangerous project in ways that I'm only beginning to understand!

Speaking of the gloves, I really will post instructions for how I did my pair. Here's a sneak preview of the right glove while I work on making sense of my notes. Check out my "organic" thumb gusset!